Thursday, December 20, 2012

Postpartum Depression For Dummies, 2nd Edition


Penulis: Chow, Cheryl
Impresum: HOBOKEN: WILEY PUBLISHING; 2007
Kolasi: xii, 276 hlm.
Keyword: Postpartum, Depression
ISBN:    978-0-470-12170-2
Tebal    362 halaman

   It's a great blessing when a new mom with postpartum depression (PPD) is fortunate enough to be diagnosed early by a knowledgeable medical practitioner or therapist. But without guidance, it isn't always clear where the boundary between normal baby blues and PPD lies. As with any other illness, the quicker that PPD is identified and treated, the faster the woman will recover.
   Postpartum Depression For Dummies can help you begin the process of determining what’s going on with you and give you a better idea of where you fall so that you can get yourself into proper treatment right away. The book covers all aspects of PPD, from its history and its origins to its effects on women and their families to the wide variety of treatments available—including conventional Western medicine, psychological therapy, alternative medical treatments, and self-care measures. Postpartum Depression For Dummies reveals:

- Why some doctors may be hush-hush about PPD
- How to distinguish between pregnancy hormone changes, "baby blues," and PPD
- The difficulties of getting a proper diagnosis
- The role and importance of a therapist
- The benefits of medication for depression
- Alternative treatments with  a successful track record
- How to find the right balance of psychological, medical, and alternative treatment
- Ways you can help foster recovery
- The nutrition you need to care for yourself properly
- How to help your partner help you

   Postpartum Depression For Dummies also provides the additional resources you need—web sites, organizations, and further reading—to help avoid the unnecessary suffering caused by undiagnosed and untreated PPD and survive and thrive as a new mom


able acupuncture alternative treatments antidepressant anxiety aren’t assessment baby blues baby’s behavior bipolar disorder birth breastfeeding can’t Chapter child clients decision doctor doesn’t doula emotional especially example experience family members friends getting give happen healing healthcare homeopathy hormones important isn’t a keep medication medicine mental health mind mom’s moms mood disorder mood stabilizer mother motherhood negative obsessive panic attacks partner percent possible postpartum depression postpartum depression PPD postpartum psychosis Postpartum Support International practitioner pregnancy prescribed probably professional psychiatrist psychological psychosis recover recovery relationship remember risk scary self-esteem serotonin she’s side effects sleep someone sometimes suffering from PPD support group support person sure symptoms talk tell therapeutic therapist therapy there’s they’re things thoughts thyroid understand weeks what’s what’s going who’s woman women with PPD worry you’ll you’ve

Therapy And The Postpartum Woman: Notes On Healing Postpartum Depression For Clinicians And The Women Who Seek Their Help


Penulis:Kleiman, Karen R
Impresum:NEW YORK: TAYLOR & FRANCIS GROUP; 2009
Kolasi:xxi, 334 hlm.
Keyword:Postpartum
ISBN:978-0-415-98996-1;1135856338
Tebal    250 halaman

   This book provides a comprehensive look at effective therapy for postpartum depression. Using a blend of professional objectivity, evidence-based research, and personal, straight-forward suggestions gathered from years of experience, this book brings the reader into the private world of therapy with the postpartum woman. Based on Psychodynamic and Cognitive-Behavioral theories, and on D.W. Winnicott's "good-enough mother" and the "holding environment" in particular, the book is written by a therapist who has specialized in the treatment of postpartum depression for over 20 years. Therapy and the Postpartum woman will serve as a companion tool for clinicians and the women they treat.


ability ambivalence antidepressant anxiety asked assessment baby baby’s believe bipolar disorder breastfeed breastfeeding breath can’t CHAPTER child childbirth client clini clinical clinicians comfortable D. W. Winnicott didn’t disorder early emotional everything experience eyes feel better felt guilt happen hard healing healthcare hear husband illness infant intervention look maternal mean medication Megan Melissa mood mood disorders mother never obsessive okay options pain partner postpar postpartum depres postpartum depression postpartum period postpartum psychosis Postpartum Stress postpartum women pregnancy psychiatrist psychosis psychotherapy questions reassurance recovery relationship response risk role scary screening sense session she’s sick sion sleep sleep deprivation smiled someone Sometimes SSRIs suicidal sure talk tell therapeutic therapist therapy There’s things thoughts tion tired told treat treatment Trish trying understand What’s Winnicott woman women with postpartum words worried you’re

Monday, December 17, 2012

Nursing Care Plan for Retinal Detachment

Retinal detachment is the separation of the the retina from the choroid (the middle vascular coat of the eye between the retina and sclera). It occurs when the retina develops a hole or tear and the vitreous seeps between the retina and choroid. If left untreated, retinal detachment can lead vission loss.

The possible causes of retinal detachment are Trauma, Hemorrhage, Myopia, Tumor, Aging, Diabetic neovascularization, Inflammatory process and Familial tendency.

Assessment findings of retinal

detachment :
  • Painless change in vision (floaters caused by blood cells in the vitreous and flashes of light as the vitreous humor pulls on the retina).
  • Photopsia ( recurrent flashes of light).
  • Blurred vision worsening as detachment increases.
  • with progression of detachment, painless vision loss that may be described as veil, curtain or cobweb that eliminates part of the visual field.
Diagnostic evaluation for Retinal Detachment :
  • Indirect opthalmoscopy shows retinal tear or detachment.
  • Slit-lamp examination reveals retinal tear or detachment.
  • Ultrasound shows retinal tear or detachment in presence of cataract.
Treatment for Retinal Detachment :
  • Complete bed rest and restriction of eye movement to prevent further detachment.
  • Laser theraphy, if there's a hole in the posterior portion of the retina
  • Scleral buckling to reattach the retina, It is a surgical procedure, which a silicone band or sponge is sewn around the eyeball a little behind the visible portion or the eye. Exactly locates the hole and places the band and tightens it creating a buckle effect and then the outer coats of the eye are indented and in this way the hole in the retina approximates the outer scleral coat.

  • Pneumatic Retinopexy, It is a short simple procedure, where a fixed amount of air is injected in the posterior part of the eye, which the air acts as an internal tamponade that helping to push and approximate the tear with the outer coat of the eye ball. Following the tear is sealed with cryo or laser therapy. Post-operatively the patient is advised rest in a specified position, in order to facilitate the air bubble to push the desired area of the retina with the tear against the sclera.


  • Sub-retinal fluid drain : make seep the fluid out through the hole behind the retina that can be drained with a small slit made in the outer coats of the eye to flatten the retina. This procedure is usually done along with sclera bucking to flatten the retina.
  • Vitrectomy: The procedure involves cutting and removal of the vitreous gel along with removal of all the fibrous tissue causing traction (pull) on the retina and detaching it, or sometimes the space is replaced with gas or silicon oil. ussually the procedure is done with the help of micro instruments and a fiberoptic light source. The procedure is combined with sclera buckling.

  • Cyropexy, if there's a hole in the peripheral retina.

Nursing diagnoses for Retinal Detachment :
  • Disturbed sensory perception (visual).
  • Anxiety.
  • Risk for injury.
Planning and goals nursing care plan for Retinal Detachment :
  • The client will remain free from injury.
  • The client will be free from permanent visual impairment.
  • The client will understand the treatment options.
Implementation nursing care plan for Retinal Detachment :
  • Asses visual status and functional vision in the unaffected eye to determine self care needs.
  • Prepare the client for surgery by explaining possible surgical interventions and technique to alleviate some of the client's anxiety.
  • Discourage straining during defecation, bending down and hard coughing, sneezing or vomiting to avoid activities that increase intraocular pressure.
  • Assist with ambulation, as needed, to help the client remain independent.
  • Approach the clients from the unaffected side to avoid startling him.
  • Provide assistance with activities of daily living to minimize frustation adn strain.
  • Orient the client to his environment to reduce the risk of injury.
  • Posoperatively instruct the client to lie on his back or on his unoperated side to reduce intraocular pressure in the affected area.
Evaluation nursing care plan for Retinal Detachment :
  • The client's vision is restored.
  • The client will remains free from injury.
  • The client will understands all discharge instructions.

Wednesday, December 5, 2012

Nursing Care Plan for Chronic Obstructive Pulmonary Disease (COPD)

Chronic obstructive pulmonary disease, also knwon as chronic airflow limitation (CAL), chronic obstructive lung disease (COLD), chronic obstructive respiratory disease (CORD), chronic obstructive airway disease(COAD) is a group of conditions that obstruct pulmonary airflow, resulting in air being trapped in the alveoli and then make difficult to breathe.

There are two main forms of COPD :

    Chronic obsturctive bronchitis, a productive cough that persisting for 3 months of the year for at least 2 consecutive years, causes inflamed airways that lead to increased mucus production and bronchospasms. Mucus plugs entrap air and result in alveolar hyperventilation. Patient will have severe hypoxemia and polycythemia, with hematrocit values from 50 % to 55 %.

    Emphysema, characterized by enlargment of the alveoli distal to the terminal bronchioles, leads to alveolar wall destruction. obstructed expiratory airflow and irreversible loss of the lung elasticity. It is causes less hypoxemia and hematrocit values commonly normal.
The causes COPD :
  • Allergens.
  • Smoking.
  • Alpha-1 antitrypsin deficiency.
  • Chronic respiratory tract infection.
  • Airborne irritants and pollutants, like certain gases or fume in the workplace and using cooking fire without proper ventilation.
Nursing Care Plan for Chronic Obstructive Pulmonary Disease (COPD).


Assesment findings in COPD :
  • Anatomic changes (such as barrel chest and clubbing) in late disease.
  • Cough (evaluate characther, frequency and time of day).
  • Decreased breath sounds, hyperresonant breath sounds on percussion and wheezing.
  • Cor pulmonale (right-sided heart failure).
  • Prolonged expiration.
  • Dyspena.
  • Jugular vein distention.
  • Peripheral edema.
  • Use of accessory muscles.
  • Pursed-lip breathing.
  • Sputum (amount, color and consistency).
  • Use of accessory muscles.
  • Risk factors.
Diagnostic evaluation for COPD :
  • ABG levels show hypercapnia and hypoxemia. Bicarbonate levels may increase to compensate for chronic hypercapnia and the resultant respiratory acidosis.
  • Pulmonary function test, especially spirometry, reveal diminished lung function.
  • Pulse oximetry may show a decrease in arterial oxygen saturation, which indicates impending hypoxia.
  • Complete blood count shows elevated hemoglobin level and hematocrit.
  • Chest X-ray provides baselines norms; in late disease, the patient's diaphragms appears flat.
  • ECG shows signs of right ventricular hyperthrophy in late disease.
Treatment for COPD :
  • O2 therapy at 2 to 3 L per minute and transtracheal therapy for home O2 therapy.
  • Fluid intake up to 3 L per day if not contraindicated by heart failure.
  • Chest physiotherapy, postural drainage and incentive spirometry.
  • Diet high in protein, vitamin C. calories and nitrogen. Patients with advanced disease may require a diet thats's low in carbohydrates and higher in fats.
Drug therapy option for COPD :
  • Antibiotic : infecting organism determines which drugs is used.
  • Bronchodilator : aminophylline, terbutaline, theophylline; by nebulizer: albuteral (proventil), ipratropium bromide (atrovent), metaproterenol sulfate (alupent).
  • Expectorant : guaifenesin.
  • Steroid : hydrocortisone, methylprednisolone sodium succcinate; by nebulizer : beclomethasone, triamcinolone.
  • Antacid : aluminum hydroxide gel.
  • Diuretic : furosemide (lasix).
  • Alpha-1 antitrypsin.
  • Vaccine : influenza, pneumovax.
Nursing Diagnoses for COPD :
    1.Ineffective airways clearance.
    2.Impaired gas exchange.
    3.Fatigue.
    4.Chronic low self esteem.
Planning and goals of nursing care plan for COPD :
  • The client will have an adequately clear airway.
  • The client will establish an effective breathing pattern.
  • The client will maintain adequate gas exchange.
  • The client will remain free from infection.
  • The client will understand why he should avoid respiratory irritants.
Nursing intervention for COPD :
  • Assess respiratory status and ABG and pulse oximetry studies to evaluate oxygenation.
  • Administer low-flow oxygen, if indicated, ussually 1 to 2 L per minute in 24 % to 28 % concentrations (Client with emphysema respond only to low oxygen tension, if it too much oxygen reduces the drive to breathe and contributes to respiratory failure)
  • Monitor cardiovascular status to detect arrhythmias related to hypoxia or adverse response to medications.
  • Monitor and record amount, color and consistency of sputum.
  • Encourage the cllient to drink plenty of fluids and weight patient daily to monitor for fluid overload and right -sided heart failure.
  • Monitor electrolytes levels, blood counts and drug levels for indications of possible toxic reaction.
  • Encourage activity as tolerated to help the client to avoid fatigue.
  • Provide chest physiotherapy, including postural drainage and percussion, incentive spirometry and suction as needed- to aide in removal of secretions.
  • Administer medications as prescribed to relieve symptoms and prevent complications.
Nursing evaluation for COPD :
  • The patient remain free from respiratory tract infection.
  • The patient will regularly practices breathing exercises and his breathing efficiency increases.
  • The patient will stop smoking and obtains a job with little or no exposure to respiratory irritants.

Best Practices: Tube Thoracostomy Insertion


Sarah L. Melendez, MD; Mark A. Silverberg, MD Contributor Information


 Tube thoracostomy is the insertion of a tube (chest tube) into the pleural cavity to drain air, blood, bile, pus, or other fluids. Whether the accumulation is the result of rapid traumatic filling or insidious malignant seepage, placement of a chest tube allows for continuous, large volume drainage until the underlying pathology can be more formally addressed. The list of specific treatable etiologies is extensive, but without intervention, patients are at great risk for major morbidity or mortality.


ndications for chest tube placement (thoracostomy) include the following:
- Pleural effusion (shown)
- Spontaneous or traumatic pneumothorax
- Tension pneumothorax (should be treated first with needle decompression and then with tube thoracostomy)
- Empyema
- Hemothorax
- Chylothorax


Standard instrumentation for tube thoracostomy is shown. To perform a chest tube placement, the following equipment is needed: sterile gloves, preparatory solution (chlorhexidine and/or Betadine), sterile drapes, surgical marker, two 10- to 20-mL syringes, a 25-gauge 5/8" needle, a 23-gauge 1.5” needle or 27-gauge 1.5” needle (for instilling local anesthesia), no. 10 blade on a handle, Vaseline gauze, ten 4×4 inch gauze squares, sterile adhesive tape (4" wide), 0 or 1-0 silk or nylon suture, large and small needle drivers, large and medium Kelly clamps, large curved Mayo scissors, large straight suture scissors, lidocaine, and a drainage device (with suction source and tubing).


Standard instrumentation for tube thoracostomy is shown. To perform a chest tube placement, the following equipment is needed: sterile gloves, preparatory solution (chlorhexidine and/or Betadine), sterile drapes, surgical marker, two 10- to 20-mL syringes, a 25-gauge 5/8" needle, a 23-gauge 1.5” needle or 27-gauge 1.5” needle (for instilling local anesthesia), no. 10 blade on a handle, Vaseline gauze, ten 4×4 inch gauze squares, sterile adhesive tape (4" wide), 0 or 1-0 silk or nylon suture, large and small needle drivers, large and medium Kelly clamps, large curved Mayo scissors, large straight suture scissors, lidocaine, and a drainage device (with suction source and tubing).


To begin the procedure, place the patient in a supine position or at a 45-degree angle, to reduce the risk of diaphragm elevation and improper chest tube placement. Abduct and externally rotate the arm on the patient’s affected side, so that the patient’s palm lies behind his or her head. A chest tube is typically inserted in the triangle of safety, a region delineated by the anterior border of latissimus dorsi, the lateral border of pectoralis major, and a horizontal line lateral at the level of the nipple, or about the 5th intercostal space. The tube insertion area is between the midaxillary and anterior axillary lines at the level of the nipple. Prepare and mark the skin (shown) to demarcate the relevant anatomy


nject a systemic analgesic (shown), unless contraindicated. Using the 25-gauge needle, inject 5 mL of local anesthetic solution into the skin that will overlie the initial incision. Using the 23-gauge or, preferably, 27-gauge needle, infiltrate approximately 5 mL of the anesthetic solution to a wide region of subcutaneous tissue that is superior to the targeted site of initial incision. Redirect the needle along the expected course of the chest tube. Inject approximately 10 mL of anesthetic solution into the periosteum (if bone is encountered), intercostal muscle, and pleura. Look for aspiration of air, blood, or pus into the syringe, to verify that the needle entered the pleural cavity.


With the no. 10 blade, make a 4-cm horizontal skin incision (shown) above the rib that is below the desired intercostal level of entry.


Use a Kelly clamp to bluntly dissect through subcutaneous tissue and fascia (shown), creating a tract by intermittently advancing the closed instrument and opening it.


Use an index finger to palpate the tract (shown) and tunnel upward over the rib that is above the skin incision. Inject additional local anesthetic into the intercostal muscles and pleura.


Using the closed Kelly clamp, apply some force and a twisting motion to pass through the intercostal muscles and parietal pleura and enter into the pleural space (shown). Be careful to perform this motion with a controlled approach, to prevent the clamp from entering too far into the chest and potentially injuring the lung or diaphragm. Listen and feel for a pop (resulting from a rush of air or fluid) to confirm the entry of the Kelly clamp into the pleural space.


Within the pleural space, open the Kelly clamp and then withdraw it so that its jaws enlarge the dissected tract through all layers of the chest wall (shown). This will make it easier to insert the chest tube. When opening and withdrawing the Kelly clamp, the orientation of the clamp should be parallel (as opposed to perpendicular) to the rib space, in order to minimize morbidity associated with damage to the neuromuscular bundle.


Use the index finger to palpate the tract and feel for adhesions (shown). Rotate the finger by 360 degrees, to confirm the tract and try to loosen and break easily disrupted adhesions. Do not try to lyse significant, organized adhesions manually, as doing so may cause significant bleeding. Determine the distance between the incision and the apex of the lung, in order to know how far to advance the chest tube.
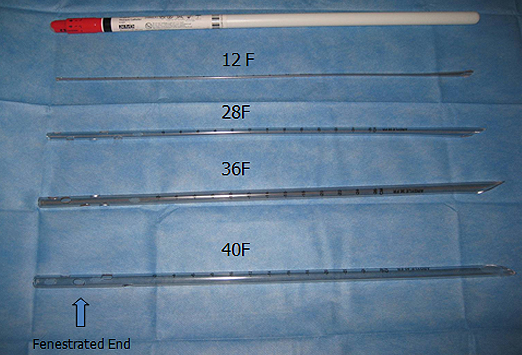
 Clamp the fenestrated proximal end of the chest tube with a Kelly clamp (shown) and introduce it through the tract. Next, clamp the distal end of the chest tube until it can be connected to a drainage system, in order to prevent blood from pouring out of the tube onto the floor.
 
Hold the chest tube in one hand and direct it through the incision (shown), releasing the Kelly clamp proximally and pushing in posteriorly and superiorly using a circular motion.


Use the index finger of the other hand to help guide the chest tube posteriorly and superiorly (shown), using circular motion and making sure all holes are within the thoracic cavity


Make certain that the final hole is inside the thoracic cavity. This hole crosses the white line on the tube (shown) and aids in detecting it on x-rays.


Connect the chest tube’s distal end to a drainage device (shown). To make it easier to connect to the drainage device, some practitioners cut the distal end of the tube. Once the chest tube and drainage device are connected, release the cross clamp that is on the chest tube. To confirm proper intrathoracic placement, look for a respiration-related swing in the fluid level of the drainage device and for respiration-related condensation levels in the tube.


Suture the tube securely to the patient’s chest with 1-0 silk or nylon sutures (shown), using a curved or straight needle.


To secure sutures, use 2 distinct through-and-through, simple, interrupted stitches on each side of the chest tube (shown). Ensure that there are no possible areas for air to leak. Each stitch should be tied tightly to the skin, then wrapped tightly around the chest tube several times to cause slight indentation, and then tied again without breaking suture. Some physicians favor locking sutures to secure a large-bore thoracostomy tube.


Place Xeroform gauze (shown) over the skin incision. Fold the gauze on itself, wrap it around the thoracostomy tube, and then push it down to the skin insertion site to create an additional barrier
Make an occlusive dressing to cover the chest tube. Turn regular 4×4 inch gauze squares into Y-shaped fenestrated gauze squares (shown), and secure them to the chest wall with 4-inch adhesive tape.
 To create adequate padding, place multiple gauze sponges over the chest tube (shown) as well as between the chest tube and chest wall. To minimize how much tube movement and traction is directly transmitted to the insertion site, many practitioners create a tape “tether.”
Place tape over gauze on the chest (shown). Tape the tube along the chest wall in an “umbilicated” fashion to prevent kinking of the tube as it passes through the chest wall. This will also help to reduce wound site pain and discomfort for the patient.
Check to make sure that the chest tube is still working. Then, tape the distal end of the tube to the drainage system (shown). Be sure to tape along the long axis, so as not to obstruct your ability to see the tube and its drainage. The most common area for clots to form is at the connecting ends of the tubes


Confirm tube placement with chest x-ray (shown). Notice the final hole (arrow) is in the thoracic cavity and is seen as an interruption in the white line of the chest tube.
Complications of chest tube placement include horizontal placement over the diaphragm (acceptable for hemothorax; tube should be repositioned for pneumothorax), placement in subcutaneous tissue outside thoracic cavity (shown; note the subcutaneous emphysema), final hole outside of thoracic cavity, and kinked tube. Once sterility has been broken, it is never appropriate to advance the chest tube; it may only be withdrawn. Sterility is broken when the chest x-ray is performed. It is not permissible to withdraw and readvance the existing tube in a new position. If the tube needs to be repositioned by withdrawing and readvancing, then a new tube must be placed through a new incision.

Share

Twitter Delicious Facebook Digg Stumbleupon Favorites More